Showing posts with label android. Show all posts

Saturday, October 17, 2020

Does Xamarin owe its existence to Unity & Apple?


Yes, Xamarin owes its existence to two other bits of technology that were huge around 2008 - the Unity Game Engine and the iPhone. The reason is that a confluence of events around 2008 provided the push to get the Mono project into mobile app development. This resulted in MonoTouch (for iOS) and Mono for Android, which eventually became Xamarin as we know it today.

The Mono project was founded in 2001 as a free open source implementation of Microsoft's .NET framework on Linux. But Mono had struggled since its inception to find its reason for being. According to Mono's founder, Miguel De Icaza, the hardcore free open source community never fully got behind Mono. The FOSS community feared that Microsoft would eventually cause problems for Mono, due to Microsoft being the creator of .NET. 

Outside of the Linux world however were other more pragmatic people from the MacOSX world who had no problem with Mono. One of these people was Joachim Ante, from Unity. Around 2005 the Unity game engine was just starting out and had a performance problem - their original scripting language of Python was far too slow - they needed something that was an order of magnitude faster. So Unity decided to replace the Python scripting with Mono/C# and immediately got all the performance they needed. This was the early days when the Unity Game Engine ran on MacOSX only. Mono filled the need of being a free open source JIT compiler with the modern language of C#.

Fast forward to 2008 when the iPhone App Store launched; Unity quickly set their sights on being able to compile games for the iPhone. Unity wanted to use Mono, but the additional requirement was that it had to be statically compiled for iOS, because Apple had banned the use of JIT (Just In Time) compilers in iOS Apps.

Unity comes back to us and says “Hey, we have this product on iOS, we need .NET to be statically compiled. Can you do that?” We were like, “Oh, that’s kind of impossible. Well, let’s think about it.”

One of our guys, Zoltán Varga - they went and made a static compiler for .NET, and it was amazing. We gave it to Unity. At this point, Unity is probably four or five employees.
    
They were working at somebody’s garage. And they shipped their product for iOS, built games for iOS using this thing, this 3D tech. They were the kings of this space.
    
- Miguel De Icaza (Xamarin)

Within a year of the iPhone App Store launch, Unity went from 4-5 employees to 80 employees. The iPhone and the App Store had launched Unity's massive growth, and along with this the Mono project had finally found its reason for being - mobile apps. The Mono developers realised there was interest in using .NET for mobile apps - so using the same tech given to Unity, they built their own product - MonoTouch, which allowed developers build native iOS apps using C#. Soon afterward, Mono turned its attention to Android and created Mono for Android.

Mobile app development was new and there were many developers who wanted to get into mobile apps but didn't really want to have to learn Objective-C and Java. So Mono now had a C# based cross platform app development platform with truly native performance. This was the killer combination that ensured Mono would take off in popularity.

The developers behind Mono founded the Xamarin company in 2011, MonoTouch became Xamarin.iOS and Mono for Android became Xamarin.Android. Xamarin was acquired by Microsoft in February 2016 and became a subsidiary of Microsoft, fully focused on the development of Xamarin's open source projects.

Inspiration for this article:

The History of GNOME, Mono, and Xamarin
https://changelog.com/podcast/275


Follow @dodgy_coder on Twitter


Thursday, April 18, 2019

Inactive/Failing Mobile Apps: The Many Benefits of Regular App Updates

This article applies mainly to mobile apps which are not in active development. It applies equally to mobile apps on the public app stores and also to enterprise mobile apps which get distributed via other means (such as MDM software).

Example scenario of an inactive/failing app:
  • The active marketing of your app that happened at launch has now stopped
  • Your app's last update was several months ago
  • The uninstallation rate has started rising above your installation rate month on month

A way to prevent this happening is to release regular app updates, even when there are no major changes to your app's code.


Benefits of releasing regular app updates:

  • Gain new users; many users look at the last release date on the app store page before downloading your app. Anything over a year old can be immediately rejected as out of date.
  • Prevent uninstalls; seeing your app has been updated on their phone keeps it in the user's mindshare, so they know you are still actively developing it.
  • Update the dependencies; you will likely have several dependencies on open source libraries and mobile SDKs. The more often you release, the more often these can be updated too.
  • Update the toolchain; Xcode / Android Studio / Visual Studio get updated once every month or two. Same applies to hybrid and cross platform toolchains such as Unity, Ionic and Xamarin.
  • Update the store listing; since you're doing a build, take the opportunity to review and tweak the store listing and screenshots. Apple's App Store Connect website and Android's Google Play Console get updated regularly with enhancements you can take advantage of.
  • Less build issues; there will be a lower chance of a major build issue if you regularly update your toolchain and its dependencies. In my experience, the longer you wait between app builds and releases, the greater the chance of a major build issue the next time.
  • Source control change visibility; the project is kept active in terms of source control history; especially relevant if its an open source project with other potential developers able to see the change history on github or bitbucket.
  • Developer benefits; you don't end up with a legacy mobile app that noone can get building anymore.

What if there are no significant changes to your code?
  • Have the dependencies or toolchain been updated? If yes, that means your app has gained some potential bug fixes and enhancements for free - just by doing a build.
  • There's always some minor refactoring you can do to make small improvements to your codebase. Just spend a couple of hours if that's all you can spare.
  • The release note; just use the standard "Bug fixes, performance and stability improvements" if you can't think of anything else.

How often to release?
  • The more often the better.
  • Aim for a regular release cycle of between 1-3 months.

Further reading

Distribution of Android apps per download range
https://www.statista.com/statistics/269884/android-app-downloads/

Download distribution of Android apps, and lifetime growth rates per download range
https://www.appbrain.com/stats/android-app-downloads

Statistics about the release schedule of apps on the Apple app store
https://stories.appbot.co/how-often-should-you-update-your-app-9405b85a967c

Best practices for Apple app store updates
https://developer.apple.com/app-store/app-updates/


Follow @dodgy_coder

Subscribe to posts via RSS


Sunday, September 18, 2016

Lightweight IoT Command and Control

Many hobbyist IoT projects running on the Raspberry Pi (RPi) require a webserver running on the RPi which receives requests from a browser, where the client using the browser is connected either to the local WiFi network, or possibly (via a port forwarding setup), connected to the public Internet.

An alternative that is easy to setup, lightweight and low cost is one that makes use of Amazon's SQS (Simple Queue Service) to setup two queues. One queue is for commands - from a mobile application to the RPi. Another queue is for responses - from the RPi back to the mobile application. It results in a simple and easy to secure solution available over the public Internet. It requires no port forwarding - both endpoints make use of a client connection to Amazon AWS. Given the small amount of messages needed for typical hobbyist project, the SQS component will be covered by the AWS free tier.

Here's the high level design of the system ...

Lightweight IoT Command and Control
On the Raspberry Pi, a lightweight application is running that makes use of the excellent Python boto3 AWS SDK library. It is always waiting for a command to arrive in the command queue. As soon as it receives a command, it processes it and adds a response to the response queue.

On the mobile device an Android application is running that makes use of the AWS Mobile SDK for Android. When the user presses a command button, such as 'Open Garage Door', it adds a command to the command queue, and asynchronously waits for a response to arrive in the response queue. When it receives a response (e.g. the command's success or failure status), it updates the app's user interface.

Saturday, February 28, 2015

Setting up a Bonjour (Zeroconf) service name for your Raspberry Pi and accessing it from an Android App

I have written an Android app that communicates to my Raspberry Pi over SSH (using JSch) but the issue is that in the App the IP address of my Raspberry Pi has been hardcoded at 192.168.1.109 - ideally it would be good to be able to give it a local name, something like garagedoor.local - something that won't change when the DHCP assigns a different IP address.

It turns out that the way to do this isn't difficult on the Raspberry Pi and most of work is in changes to the Android App needed to make it happen. I've numbered the steps 1-4.

1. Configuration of your Raspberry Pi.

# Get superuser privileges
sudo su

# Change the host name of your Raspberry Pi from "raspberrypi" to "garagedoor"
# Reference: http://www.howtogeek.com/167195/how-to-change-your-raspberry-pi-or-other-linux-devices-hostname/

sudo nano /etc/hosts            # <== Replace raspberrypi with garagedoor
sudo nano /etc/hostname         # <== Replace raspberrypi with garagedoor

sudo /etc/init.d/hostname.sh    # Commit the changes.
sudo reboot                     # Reboot

# Install the mDNS implementation - avahi
# Reference: http://www.howtogeek.com/167190/how-and-why-to-assign-the-.local-domain-to-your-raspberry-pi/
# Get superuser privileges
sudo su

# Update the package sources
apt-get update

# Ugrade the packages
apt-get upgrade

# Install the mDNS implementation - avahi
sudo apt-get install avahi-daemon


That's the end of the changes needed on your Raspberry Pi.

2. Test on either Windows, Linux or Mac OSX that the Raspberry Pi is visible on the network with its new name of "garagedoor.local".

On Windows, you will need to have Bonjour Networking Services installed, which comes bundled with iTunes.
Run a cmd.exe prompt and type the command ping garagedoor.local -- you should get a response from your Raspberry Pi.

On Mac OSX, Bonjour Networking Services are installed by default.
In a bash terminal window, type the command ping garagedoor.local -- you should get a response from your Raspberry Pi.

On Linux, first ensure you have installed the avahi-daemon package.
In a bash terminal window, type the command ping garagedoor.local -- you should get a response from your Raspberry Pi.

3. Using NSD (Network Service Discovery) on Android to resolve the Raspberry Pi's service name.

Browsers and terminal programs on Android won't be able to resolve the garagedoor.local since to do this requires use of either the official Network Service Discovery library (supported by API Level 16 up) or the open source Java Zeroconf library named jMDNS.

In my case, I am using a custom app I wrote to communicate to the Raspberry Pi, so I have decided just to use the Network Service Discovery library.

4. Source code changes needed in the Android App to support NSD (Network Service Discovery)

Notes:
 (1) Below is just how I decided to implement it, you may want to separate the NSD related code out of the Activity into its own class, but for me that wasn't a problem.
 (2) I probably need to do something related to NSD in the Application lifecycle events of onPause(), onResume(), onDestroy() and onTeardown(). I haven't done that here yet.


4.A. Add some members to the Activity

I added this to my MainActivity but my app is small and so that's all I needed to do.

// Network Service Discovery related members
// This allows the app to discover the garagedoor.local
// "service" on the local network.
// Reference: http://developer.android.com/training/connect-devices-wirelessly/nsd.html
private NsdManager mNsdManager;
private NsdManager.DiscoveryListener mDiscoveryListener;
private NsdManager.ResolveListener mResolveListener;
private NsdServiceInfo mServiceInfo;
public String mRPiAddress;

// The NSD service type that the RPi exposes.
private static final String SERVICE_TYPE = "_workstation._tcp.";

   
4.B. Add some init code to the bottom of the Activity's onCreate() method.

mRPiAddress = "";
mNsdManager = (NsdManager)(getApplicationContext().getSystemService(Context.NSD_SERVICE));

initializeResolveListener();
initializeDiscoveryListener();
mNsdManager.discoverServices(SERVICE_TYPE, NsdManager.PROTOCOL_DNS_SD, mDiscoveryListener);

   
4.C. Add the following two new methods to your Activity.

 private void initializeDiscoveryListener() {

     // Instantiate a new DiscoveryListener
     mDiscoveryListener = new NsdManager.DiscoveryListener() {

         //  Called as soon as service discovery begins.
         @Override
         public void onDiscoveryStarted(String regType) {
         }

         @Override
         public void onServiceFound(NsdServiceInfo service) {
             // A service was found!  Do something with it.
             String name = service.getServiceName();
             String type = service.getServiceType();
             Log.d("NSD", "Service Name=" + name);
             Log.d("NSD", "Service Type=" + type);
             if (type.equals(SERVICE_TYPE) && name.contains("garagedoor")) {
                 Log.d("NSD", "Service Found @ '" + name + "'");
                 mNsdManager.resolveService(service, mResolveListener);
             }
         }

         @Override
         public void onServiceLost(NsdServiceInfo service) {
             // When the network service is no longer available.
             // Internal bookkeeping code goes here.
         }

         @Override
         public void onDiscoveryStopped(String serviceType) {
         }

         @Override
         public void onStartDiscoveryFailed(String serviceType, int errorCode) {
             mNsdManager.stopServiceDiscovery(this);
         }

         @Override
         public void onStopDiscoveryFailed(String serviceType, int errorCode) {
             mNsdManager.stopServiceDiscovery(this);
         }
     };
 }

 private void initializeResolveListener() {
     mResolveListener = new NsdManager.ResolveListener() {

         @Override
         public void onResolveFailed(NsdServiceInfo serviceInfo, int errorCode) {
             // Called when the resolve fails.  Use the error code to debug.
             Log.e("NSD", "Resolve failed" + errorCode);
         }

         @Override
         public void onServiceResolved(NsdServiceInfo serviceInfo) {
             mServiceInfo = serviceInfo;

             // Port is being returned as 9. Not needed.
             //int port = mServiceInfo.getPort();

             InetAddress host = mServiceInfo.getHost();
             String address = host.getHostAddress();
             Log.d("NSD", "Resolved address = " + address);
             mRPiAddress = address;
         }
     };
 }


4.D. Make use of the mRPiAddress member where previously you used a hardcoded IP address.

Check that its not empty before using it. If its empty, it means the RPi's name couldn't be resolved.


Follow @dodgy_coder

Subscribe to posts via RSS


Saturday, November 22, 2014

Android development is the new .NET

Back in 2001 Microsoft Windows had 90% of the worldwide OS market for PCs. But desktop windows software development was dire.

Developers were using tools like ...
  • Visual Basic 6 - very productive, with the downside of ugly, primitive syntax, lacking modern features such as interfaces and classes.
  • Visual C++/MFC - serious windows developers were using this, but it was less productive and extremely verbose, with lots of boilerplate.
  • Delphi -  the successor of Turbo Pascal and possibly the best of all frameworks on Windows at the time, but it never really took off.
  • Borland C++/OWL - the Open Windows Library from Borland tracked pretty closely with Visual C++/MFC, verbose + boilerplate.
  • Java - this had a reputation on Windows at the time for slow performance, bad visuals and bad tools.
At this point, Microsoft came out with Visual Studio.NET, the .NET framework and a new language named C#, with the help of former Delphi & Turbo Pascal language designer Anders Hejlsberg. Most Windows developers got on board - compared to what came before it was a breath of fresh air. Since that time, .NET has remained a large player, especially in the corporate and business market.

Fast forward to 2014, Android now has an 80% worldwide market share of approx. 1.75 billion smart phones.

Google has their own IDE, Android Studio and the open source Android SDK, which you can program using Java or any other JVM language. In the same way that .NET lets you use different .NET compatible languages such as C++/CLI and F#, Android supports other JVM languages like Scala, Clojure and Groovy, all of which let you cut down on the verbosity and boilerplate of Java.

Google is attempting to bring as many developers over to Android as possible. Their Head of Scalable Developer Relations, Reto Meier, aims to bring 50 million developers to Android.

Based on Android's market share and future employment prospects, Android is a decent choice for developers to try out. Compared to iOS, Android isn't as performant or profitable, but now it has a decent IDE, the weight of numbers, and the capability to use many Java FOSS libraries.

Follow @dodgy_coder

Subscribe to posts via RSS

Saturday, June 22, 2013

Hyperlink vs Button in Android

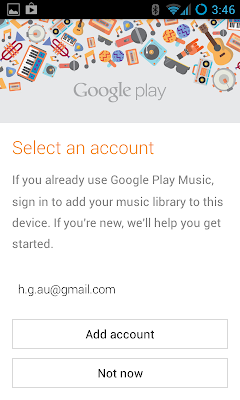
After installing the Google Play Music app, the first screen allows you to choose which Google account to associate with it.

Seems straightforward enough; but have a look at the screen - what you would press?


Looks like there's a choice of two commands, either Add account or Not now. But there's another command there ... the email address is a clickable hyperlink, but there's no indication that it is - no underline or radically different font. The Add account button actually prompts you to type in a new email address, i.e. not the one listed. One of the most confusing UI designs I've seen lately.

As discussed in this StackExchange.UX post, there's no strict rule about it, but buttons usually perform a command and hyperlinks usually take you somewhere new.

To improve it, maybe there should be a "Use" button to the right of each email address.

Follow @dodgy_coder


Subscribe to posts via RSS